In Octopus Deploy 2.6, a new feature was introduced: LifeCycles. You may be on a previous version of Octopus Deploy (2.5 or below) or you may have simply dismissed LifeCycles, but this deep dive is to encourage you to use them. They take a little bit of time to understand, but once you do they keep you disciplined and have substantial payoff with practically no overhead.
In a nutshell, LifeCycles gives three key abilities:
- an easy, consistent deployment workflow with gated deployments to control the order of promotions to environments
- flexibility in deploying to more than one environment in one click
- retention policies per environment
There’s a bonus feature for those who use the internal Octopus Server NuGet feed: automatic release creation too, but I don’t view that as the key ability to highlight. But let’s get started with how LifeCycles with an example of a project without LifeCycles. Here’s an actual release history of one of our project teams:
- Release 0.0.219 to Development environment (success)
- Release 0.0.220 to Development environment (success)
- Release 0.0.222 to Stage environment (success)
- Release 0.0.223 to Stage environment (success)
- Release 0.0.224 to Stage environment (success)
- Release 0.0.229 to Stage environment (success)
- Release 0.0.230 to Stage environment (success)
- Release 0.0.231 to Stage environment (failed)
- Release 0.0.233 to Stage environment (success)
- Release 0.0.234 to Development environment (success)
- Release 0.0.236 to Development environment (success)
- Release 0.0.237 to Stage environment (success)
- Release 0.0.238 to Stage environment (success)
- Release 0.0.239 to Production environment (success)
From a release history perspective, it’s difficult to decipher what happened and furthermore, it requires investigation. They failed to promote releases and simply created new releases for every deployment. Releases with their version numbers and deployed environments should be enough to convey a story with no additional information, but in this example, we need more or rather, they needed to stick to the same release number. From releases 0.0.219 – 0.0.222 (steps 1-3), things make sense. After that, it looks like they just deployed wherever they needed without regard to consistency. What exactly happened? Beats me. Why where there five deployments to stage in a row? Why were four deployments (225-228) missing or deleted? Are the staging releases deploying new code every time and bypassing development altogether, or are there different configurations and variable values being tested? Which release in staging actually went to production – 0.0.237 or 238?
Warning: Rant ahead
Most teams that I’ve worked with typically use Octopus Deploy in the exact same fashion as they did without it. As expected, people are creatures of habit and revert to do what they did before – even if it no longer appropriately fits the situation. Example – backups. People just love backups – but no one deletes old backups until they’re forced to. I’ve stated this before – doing file backups in automated deployments is next to worthless – yet I see people do it all the time. It makes no sense. Making backups of a site, service or whatever on the machine with the tentacle installed. You have NuGet and TFS, Git or whatever versioning control system at your disposal. There’s no need to do backups anymore. Just because you’re doing a task you used to by hand now by PowerShell does not necessarily mean you’ve efficiently automated said task.
Whether it is appropriate to do things usual or not maybe up for debate for some, but I would argue for people to rethink their deployment strategy once you have Octopus Deploy (or even another tool for that matter) altogether. With deployment automation, you’re free from the burdens of time and hassle of ye old manual deployments of yesteryear and for projects that are either massive or complex to deploy, the time gained can be substantial. But many of those whom I see with Octopus Deploy use it as if they had an invisible deployment manager; a phantom employee or a silent guardian (no – Batman is not your release manager). Call him/her what you will, but the fact is if you’re deploying to your environments in the exact same way, you may not realize that you’re utilizing automation in an optimal manner. I digress, but I think it needs to be said – deployment automation requires you to rethink your processes from the ground up.
In our sample release history, people still deploy as if nothing had changed. Automation was a seemingly awesome idea to get them into using Octopus Deploy or whatever tool, but the actual operations or practices haven’t really changed – or at very least, they’re not maximizing these automation features. As processes and procedures have been accelerated with automation, users still exhibit the same old manual mindset through their behaviors and actions. Since deployments used to be laborious, teams would skip environments. I would always get the excuse: Why go to development when we need testers to test the new changes immediately? I still find a small set of users that to create custom NuGet packages with NuGet package explorer (with one or two file changes mind you), upload said package to their feed and deploy it. Their logic? It’s just one file that needs to be changed. Why do have to deploy the whole application again? This is not a problem of Octopus or automation tools but rather users failing to see the bigger picture – that’s where Octopus comes in with LifeCycles. The LifeCycles feature is the crowbar to ween you from your old bad manual deployment habits while making it super easy and more flexible than previous versions of Octopus.
Getting Started with LifeCycles
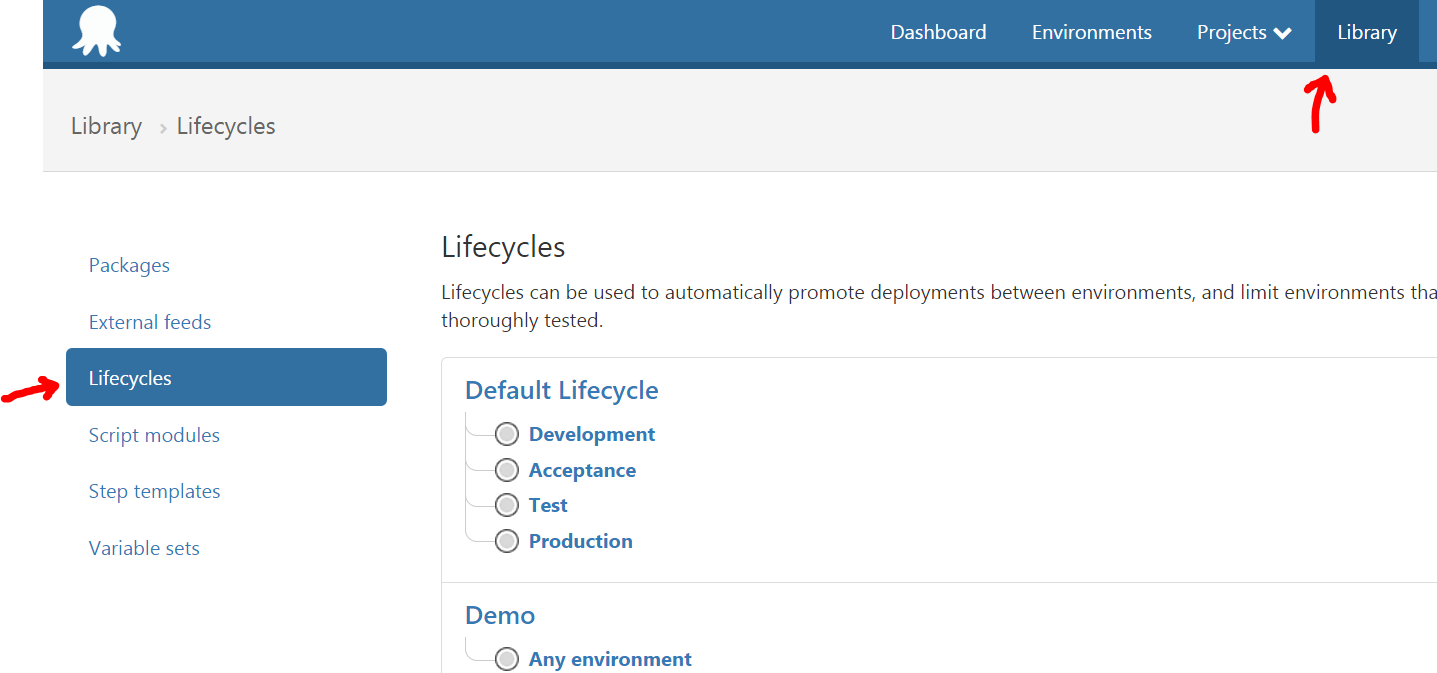
First, I highly recommend reading the official Octopus Deploy documentation on LifeCycles. Next, let’s setup your first LifeCycle. There are two ways to get to the LifeCycles page. The first way is click to the Library tab in the upper right hand corner and select LifeCycles on the left hand side. (Note, these images are from the demo site on octopusdeploy.com – as of this writing, Octopus 3.0 is still in beta).
From here you can create your own LifeCycle definition. The other way is from your project’s “Process” tab. From your process tab, you can select a LifeCycles for your process on the right hand side. To jump straight to the Library to define your own LifeCycle, underneath the “Choose a different lifecycle” link is a “Library” link. Clicking on that will take you straight to the Library/LifeCycle tab. Getting to the configuration is easy. Configuring them requires some understanding but is relatively painless and easy to implement.

Configuring your LifeCycle
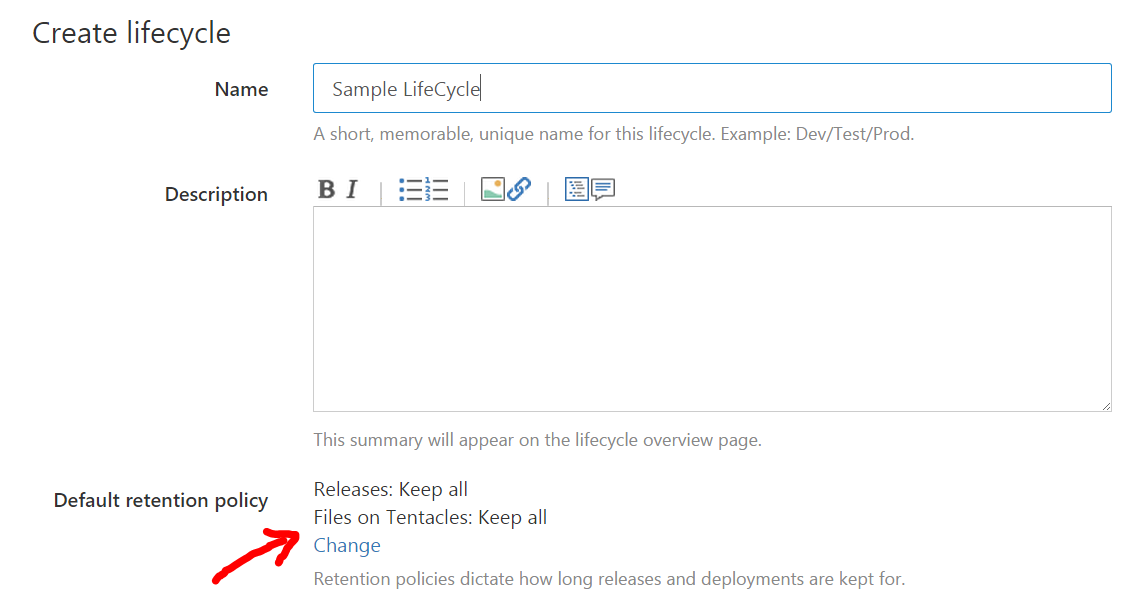
Now that you’ve reached the LifeCycles page, you can add a new LifeCycle in the upper right hand corner and click on the “Add lifecycle” button. The first menu is to give your LifeCycle a name, a description (if you so choose) and you can select the default retention policy (noted at the bottom). If you’re not familiar with retention policies, they determine how long releases and deployment history is kept for.
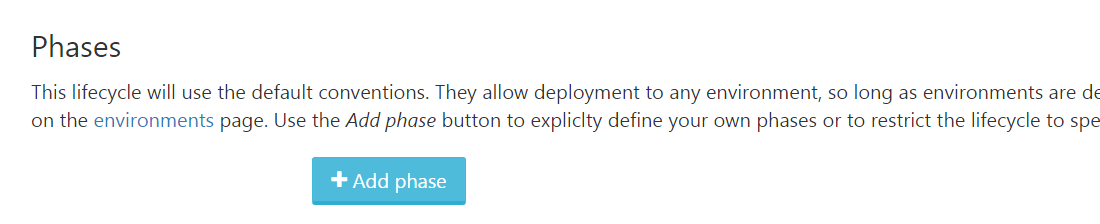
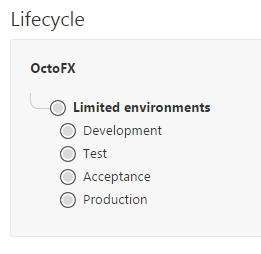
Directly below this information is where you define your LifeCycle. Phases can be thought of as gates for your deployment workflow. You can target one or more environments for a particular phase. All phases have a linear order but as I mentioned earlier, you can cheat this order by directly deploying to an environment and bypassing your defined LifeCycle phases. We’ll cover that shortly. Simply click on the “Add phase” button to add a new phase.
After clicking on the add phase button you’ll see this below. Simply give a name to your phase and add one or more environments you want to target as part of this phase. The retention policy below can be adjusted for each environment which is an awesome feature to have.

Clicking on Add environment” shows you the popup menu below. You can tell Octopus to automatically deploy to the environment but this is only applicable if you use the internal NuGet feed.
Select your desired environment from the drop down box. Note, you can tell Octopus to automatically deploy the environment or have it be a manual step. The automatic deployment requires that you use the internal Octopus NuGet feed so if you’re using external feeds (like I am), unfortunately this automation isn’t available through the UI like this, but there are other ways of triggering a release automatically using the Octo.exe.

Hit “Add” and you’ll be taken back to your phase definition. Note the icon for the environment shows that this will automatically deploy as the release enters this phase. I think the visual icon/cue of automatic deployment is nice to see at a glance.
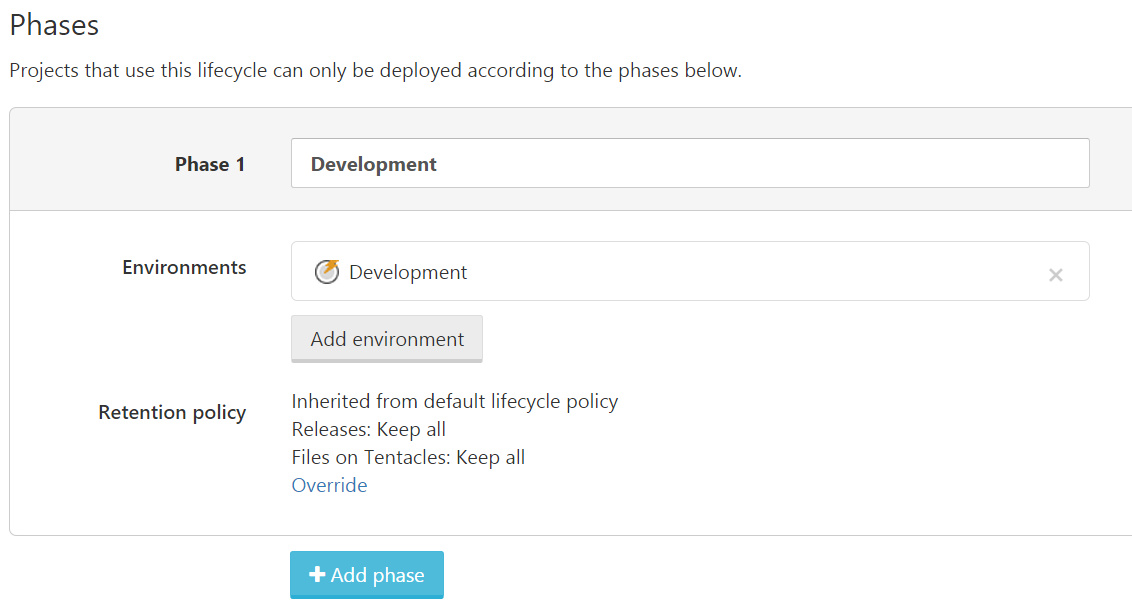
Next, let’s change the default retention policy. I don’t care about keeping all the releases and packages for development. Click on the “Override” link and you’ll see this:
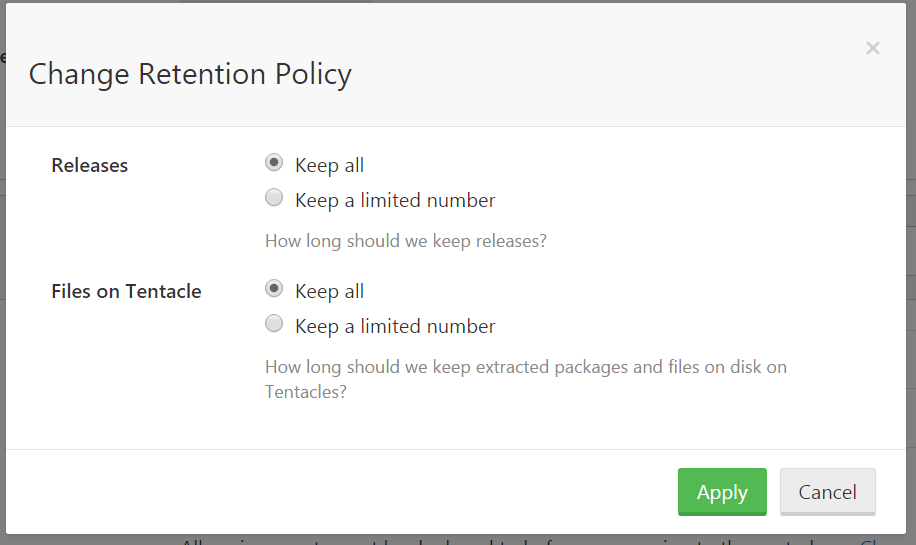
Let’s change this to something more reasonable. There’s no reason to keep ALL of your development releases. If anything, it’d be nice to keep all the production deployments, some of the staging/testing deployments, and a much smaller quantity of the development releases.
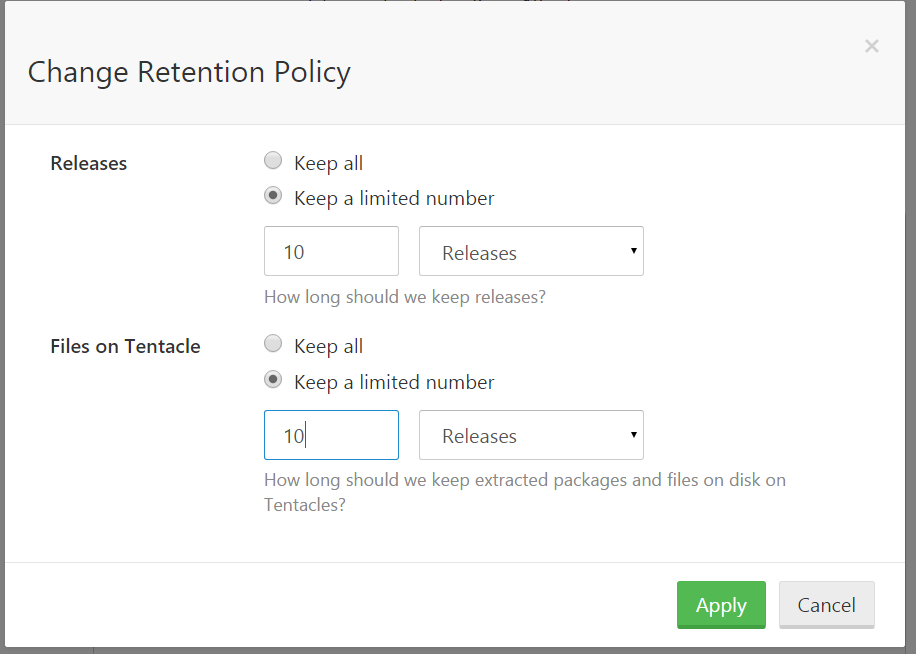
Now 10 releases might even be a bit too much even for development, but the point is that you can set it to whatever you want. And the fact that retention policies can vary between environments adds far more value by having some precision for your release clean-up. Retention policies at the project group or project level aren’t granular enough. This is a great benefit of using LifeCycles. If anything, use this ability because your development release history is usually garbage. Staging and Production release history is far more valuable to retain. You cannot do this using retention policies outside of LifeCycles.
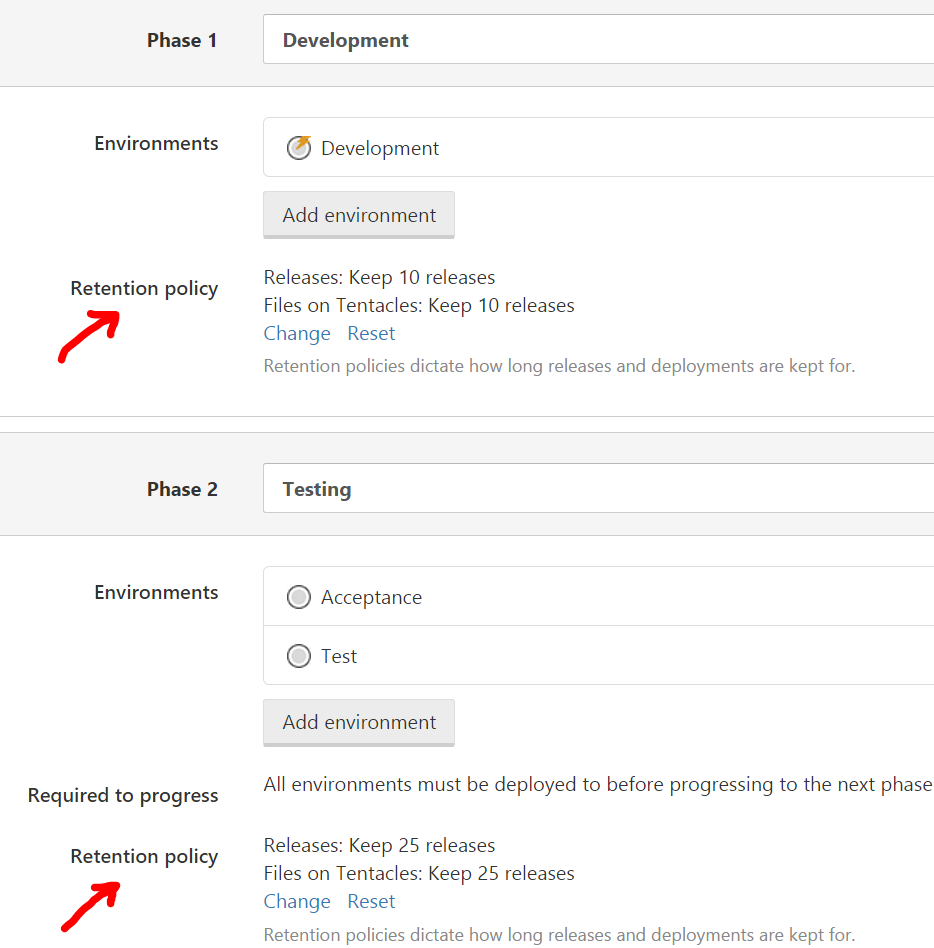
So after changing the retention policies on my Development phase, I’m going to add a Testing phase to deploy to Acceptance and Test environments. Additionally, I’ll change the retention policies for my Testing phase to 25 releases.
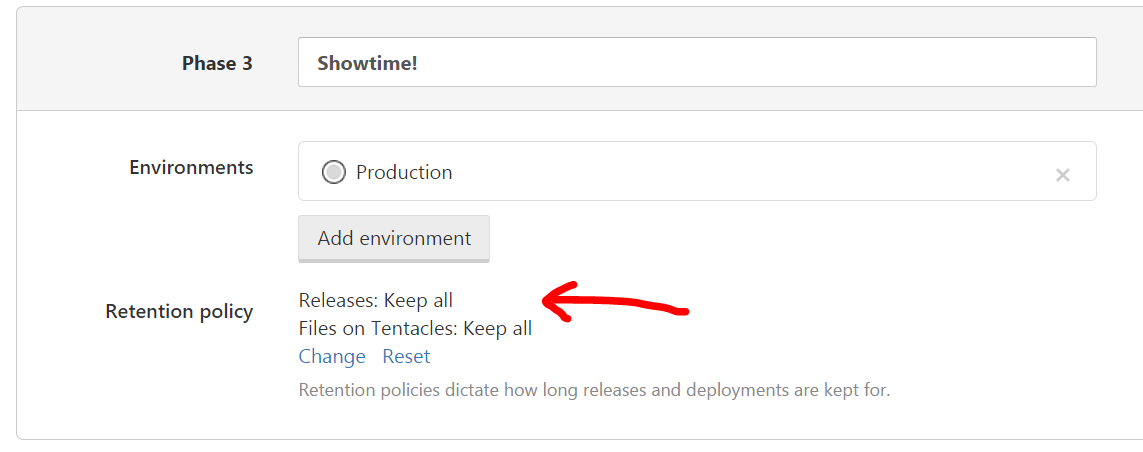
Great. Now for production, I’m going to call it “Showtime!” phase. Here, I want to keep everything. This is production. Everything matters so lets keep all the releases and history.
Now, I couldn’t save this as all of these screenshots are on the demo site and guest accounts have no write permissions. But let’s take a look at when you use your LifeCycle. On your initial deployment to your Development environment, you now have the option

When you click on the Promote button in the upper right-hand corner, you get a nice drop down of the next phase. Unfortunately on the demo site, they have no defined phases, so you can promote to any environment you’d like. If they had a phase and that next phase deployed to only the Test environment, only Test would appear below. While this screenshot example doesn’t do the feature justice, it demonstrates LifeCycles utility within Octopus Deploy.
Simply click Promote and the correct environment will appear before you. Note that all the environments are available. That’s because the demo LifeCycle in use has zero phases. If we had phases, you would only see the next environment(s) for the next defined phase.
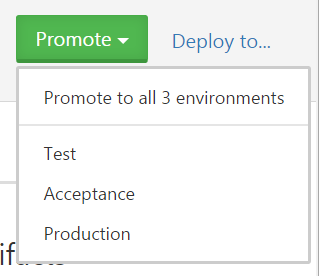
You may be wondering, what if I need to skip my LifeCycle order just this one time? See the “Deploy to…” link next to the Promote button? Click on that, and you’ll see this menu below.

From here, you can see that you can deploy to one or more (or all) environments regardless of your LifeCycle promotions. So, it’s really no trouble to use LifeCycles whatsoever. They simply add gated deployment guidance for your next enivironment. If you need to do something out of order, that’s fine. LifeCycles are guard rails for your deployments. They won’t prevent you from going off the road, but they’ll keep you on your intended path that you had defined. A side note: you can share LifeCycles across projects – so if you have a default LifeCycle you want all of your projects to use, you can easily do so.
Get to the point already
LifeCycles define your Deployment LifeStyle ™. Maybe you don’t see it that way, but I do. With LifeCycles, variables, process and versioning – all of these facets of your release management are important. LifeCycles are the guard rails on the road – they’re as passive gated deployment workflow. Easy to define, share and implement. The added benefit of LifeCycles keep you releasing to your environments, in-order as you defined. What’s the end result? Well, from the overview page on your project in the Octopus 3.0 beta, we see a really nice spreadsheet-esque view of your recent deployments. With the newest release being on top, you can see what releases were deployed, to what environment and when. It doesn’t get much easier than this. All the information seen here tells a pretty complete story – without an investigation. Being able to automate your deployments is a huge win, but going that extra mile of being consistent is oh so much sweeter.
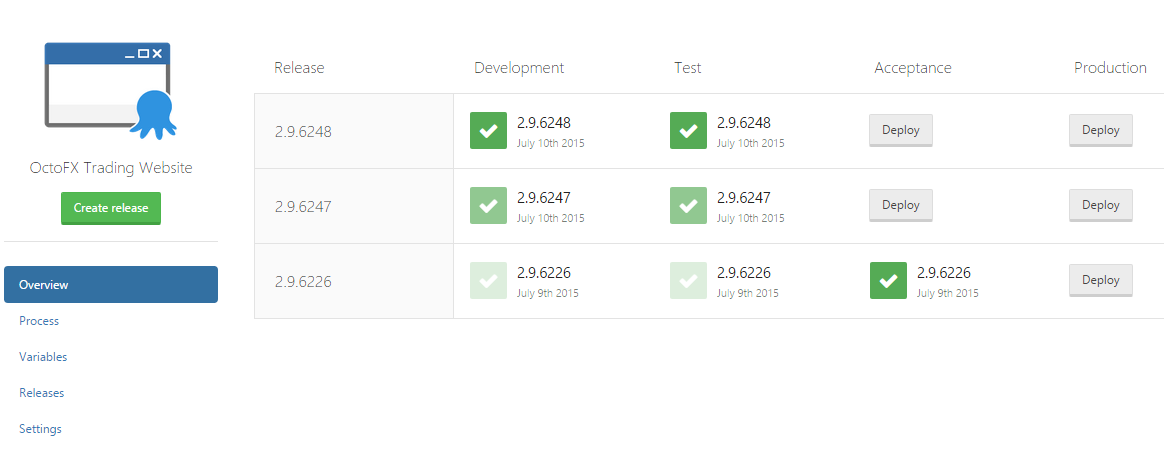
This is nice and all, but what do things look like when they go wrong? What about failures or skipping? In the screenshot below, it looks like somebody skipped the Acceptance test environments. No matter. At least you can tell just from looking. This is how things should be. Quick and easy to use, with minimal interference. Everything you need to understand for your recent deployment history is right here on the overview page. I don’t need to investigate anything and immediately I can blame the appropriate user who deployed to the Test environment and skipped the Acceptance environment.

LifeCycles are good for you, your release history and for cleaning up old release history in all of your environments. If you’re not using them now, start immediately!
TL;DR
- LifeCycles passively enforces promotions which is essential for rolling back and release version consistency. Being consistent makes things easier to interpret and since there are no more deployment headaches, there’s no excuse for deploying to environments as intended.
- Being able to set retention policies based on environments is awesome. Do not neglect this.
- You can now deploy to more than one environment via the Octopus Portal. Previously you had to use octo.exe to mimic simultaneous deployments to multiple environments.
- You can still cheat by not following your defined LifeCycle if you need to, but really you should stick to it.
- LifeCycles help you do all of this so easily, there’s no reason not to use it
I hope you enjoyed this deep dive. There’s still lots more to come in the next few weeks!
* Entering death valley from Ryan Heaney, used under Creative Commons.