To truly harness and appreciate the power and elegance of Octopus Deploy, you need to use variables. Variables are not a foreign concept to programmers, but within Octopus there are a few different types of variables available which may cause a little confusion. We’ll cover all these different types of variables in this deep dive, how to wield variables to your advantage and best practices. Let’s get started and jump right in. You may have seen the Variables tab on the left hand side of your project like so:

While this tab seems trivial, it’s one of the best ways to make your deployments more flexible, more configurable to any environment and easier to maintain. For every single project in Octopus Deploy, there’s a variables tab, but as I mentioned before, there are several ways to use of variables.
Let’s breakdown the three types of variables in Octopus:
- Variable Substitution (or Basic Syntax) – the majority of variables are of this type
- Extended Variable Syntax – this syntax allows you to have some basic flow control but is limited to email bodies or with the Substitute Variables in Files feature enabled
- System Variables – users who want to use information within the Octopus server
Variables
The Variables tab is the foremost common use of variables within Octopus Deploy. When people talk about variables in Octopus, they’re usually referring to this. It’s plain, simple spreadsheet view downplays it’s significance in enabling you to maximize automation for your deployments. I’ve worked with teams that overlook the variables tab or don’t fully utilize it to their advantage, however the teams that do leverage the variables tab learn over time how to fully master it and wield it for more successful, repeatable and fast deployments. At first glance, the tab itself doesn’t lend the notion of a lot of capabilities but it is very versatile and has a number of tricks up it’s sleeve.
With variables, you can dynamically change key/value pairs within the Web.Config or App.Config including Connection Strings based on scope. This is the most common usage of the variables tab. Let’s look at a hypothetical Web.Config example.
<configuration>
        <connectionStrings>
           <add key="dbConn" value="Initial Catalog = master; Data Source =localhost;
                                    Integrated Security = true"/>
        </connectionStrings>

        <appSettings>
           <add key="SampleKey1" value="this is just an example"/>
           <add key="SampleKey2" value="ABCDEF"/>
        </appSettings>
</configuration>
In this abbreviated sample Web.Config file, I can change the values of any key within the appSettings or connectionstring within the variables tab. The Name column refers to any key name within your Web.config. There’s no changes required of your Web.Config file – you just simply type in the name of the key and within the Value column of the row, set the value you want. It’s easy as a spreadsheet.
[table caption=”Variable Example #1″ width=”650″ colwidth=”100|400|150″ colalign=”left|left|left”]
Name,Value,Scope
SampleKey1, “This message will appear in my development environment only”, Environment=Development; Role=WebServer
SampleKey1, “This message will appear in my staging environment only”, Environment=Staging; Role=WebServer
dbConn, Server=SqlServer\SomeInstance; Database=DevDb; User Id=appUserId; Password=blahblahblah, Environment=Development; Role=WebServer
dbConn, Server=SqlServer\SomeInstance; Database=StgDb; User Id=appUserId; Password=yaddayaddayadda, Environment=Staging; Role=WebServer
[/table]
The table above depicts my hypothetical variables changes for a Web.Config file. In this example, I’m showing that I’m modifying the connection string “dbConn” and the appSettings key “SampleKey1”. Note, I don’t have to change anything within my Web.Config to get this to work. I can reference the keys in the config file directly by name. To use the variables explicitly within my steps, all I have to do is wrap the variable name with the symbols: #{ } like so. For each line in the variables table, I’m changing the values based on the scope column. What does scope do exactly?
Scope
Clicking on the scope field brings up a pop up box as displayed below. Scope allows you to specify the value of the variables based on four factors: environment(s), role(s), machine(s), step(s) – this gives you any level of precision that you require – whether it’s a wide area of effect down to the most granular. Scope allows you to define what a variable’s value is based on any combination of the four. This makes applying values a breeze – whether you need to be extremely specific or very broad, the scope within the variables tab is very powerful.

Being able to modify the Web.Config or App.Config files within your project by not resorting to searching and replacing within PowerShell is a huge bonus. The effort required is trivial and the dividends are huge. There’s no real downside to leveraging variables within your project for your configuration files but I will say for projects with hundreds of variables, it simply takes a little more effort to find the right variable to make a modification. It’s worth the time and energy in adding whatever configuration information you have across your environments into the variables tab but you need to be prudent to about how your variables are configured in order to keep maintenance and debugging relatively trivial. We’ll follow up on this idea later on.
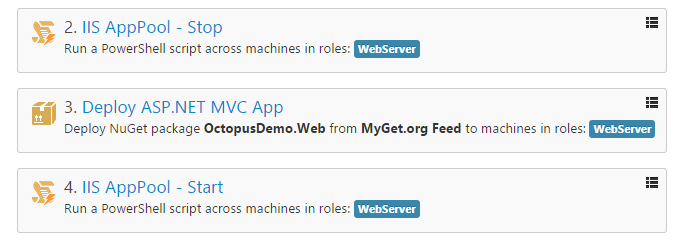
Now variables can also be used to store values for specific paths, names, or other configuration information. Within the very same spreadsheet view you can house any number of variables at your disposal for customization of your deployment. That’s to say, you aren’t limited to using variables solely for configuration files. For example, let’s say I want to customize the “IIS AppPool – Stop” step within my deployment process. Rather than create three steps to represent my environments (Dev, Stage, Prod) I’m going to use three variables to represent each value for each environment all in one step. I could just use one value to represent all of my AppPool names and keep them the same, but in this example I’m going to set unique names for each AppPool per server in an environment. You can see the settings of my variables tab below.

With three rows referring to the same variable name, I can adjust the value of ‘WebAppPoolName’ by altering the scope. Note that my scope is only setting the environment and the server role – specifying a step or a machine in my example is unnecessary. There’s nothing to gain by being more specific in this scenario. If I had added another server to my production environment, I’d have to alter my scope if I had made the scope any more specific.

Within the IIS AppPool – Stop step, I’m going to dynamically change the App Pool Name. Clicking on the little icon to the right of the text box field brings up a menu that shows all the variables available to me. The very first one is my WebAppPoolName. Clicking on that prints #{WebAppPoolName} in the text box field. Clicking on “WebAppPoolName” in the dropdown automatically adds the #{ }.
A ‘minor’ best practice detour
In my experience, I’ve often seen users be too specific regarding scope. While being super-specific with your variable values seems like the right thing to do, being too granular can be a pitfall. How so? If you’re overly specific with a variable, an environment, machine and/or step – you’re setting yourself up for maintenance nightmares and deployment issues. Now, there are always exceptions to every rule however as a general guideline with variables and Octopus, I highly recommend being slightly less specific if possible. Huh?
Let’s go back and revisit my slightly tangent example of appropriate granularity for scope in the prior image: see how I’ve left the “Environments” text box (under Conditions) empty? It defaults to “All environments”. This is how I’m able to apply one step across all environments and change the value of the App Pool Name however I please. A benefit of leaving your environments condition empty is for future environments that I have not yet added to my project. Octopus’s environment fields are inclusive by default and exclusive when you specify an environment, meaning if you leave the field empty, Octopus will apply the step to all of your environments. The moment you add an environment in that field, Octopus will make that step exclusive to only the environments that you added. Makes sense doesn’t it? But how is this a maintenance problem?
Say for example, months go by and the project has decided to add a performance testing and user acceptance testing environments. If I had specified all of my steps with specific environments – guess what? I’d have to add two more environments for all the steps I explicitly stated. If you have a lot of steps, this can be a huge problem (side note: I’ve seen one project with over 150 steps! Can you imagine maintaining that?). But had I left the environment condition empty which implies “All environments”, then I would not need to change a thing. While environments may not be variables, the same reasoning applies. Being too overly specific and verbose forces you to continually be explicit. In turn, this creates more work, redundant entries and ultimately doesn’t benefit you any more than being a little more pliable with your scope. (Note: I’m going to bring this issue up a lot in this deep dive as I’ve seen a lot of teams struggle with this idea of scope and how to properly apply it)
Variables can be used within other variables as to change values within values (also called “Binding” in the Octopus documentation). While I seldom use this ability, it is a nice option to have should you need it. The most frequent use I’ve seen of this ability is with connection strings – but I’m certain there are other ways to leverage binding. Here’s an example web.config with typical database connection strings. Keep in mind this specific example may not be commonplace, but I’m trying to convey the idea of consolidating environment specific configurations within the Web.Config file and let Octopus variables do the dirty work. Here’s three connection strings for three separate environments for a sample application:
<connectionStrings>
  <add key="dbConn-Dev" value="Server=SqlDbSrv-01\SampleAppDev;Database=sampleDb;User Id=appUserId;
                               Password=Jq^W9HKGP6bP;"/>
  <add key="dbConn-Stg" value="Server=SqlDbSrv-01\SampleAppStg;Database=sampleDb;User Id=appUserId;
                               Password=9C>=rd;_n=+j;"/>
  <add key="dbConn-Prd" value="Server=SqlDbSrv\SampleAppPrd;Database=sampleDb;User Id=prodAppId;
                               Password=9& R^|==5ur"/>
</connectionStrings>
Within Octopus, you can treat the value field as a whole OR you could manipulate elements within the connection string. If you choose to manipulate the details within the value field, you need to still have to control the entire string within a variable as well. From that base connection string variable, you can simply embed more variables for the parameters within the connection string within the variable value. Well, let’s start with a simple example for Octopus to manage this on our behalf. First, I’m going to change my current web.config to something more appropriate. I don’t have to do this for Octopus to work correctly, but for our example, it’s best to clean things up. Here’s the modified connectionStrings section:
<connectionStrings>
  <add key="dbConn" value="Server=SqlDbSrv-01\SampleAppDev;Database=sampleDb;User Id=appUserId;
                           Password=Jq^W9HKGP6bP;" />
</connectionStrings>
I removed two of the entries for brevity but I could have easily left them there. Additionally I’ve changed the key name to dbConn and set the default connection string target for the development database. Here’s a simple example of how Octopus can be used to store the connection strings in our example for any given environment.
[table caption=”Variables Example #2″ width=”650″ colwidth=”100|400|150″ colalign=”left|left|left”]
Name,Value,Scope
dbConn,Server=SqlDbSrv-01\SampleAppDev; Database=sampleDb; User Id=appUserId; Password=Jq^W9HKGP6bP, Environment=Development; Role=WebServer; Machine=DevWeb01|DevWeb02
dbConn,Server=SqlDbSrv-01\SampleAppStg; Database=sampleDb; User Id=appUserId; Password=9C>=rd;_n=+j, Environment=Staging; Role=WebServer; Machine=StgWeb01|StgWeb02
dbConn,Server=SqlDbSrv\SampleAppPrd; Database=sampleDb; User Id=prodAppId; Password=9& R^|==5ur, Environment=Production; Role=WebServer; Machine=PrdWeb01|PrdWeb02|PrdWeb03
[/table]
Easy enough? We’re simply telling Octopus, find the key name “dbConn” and stick the contents of our value into our config files based on the scope I defined which used the environment and the role of the server. It’s pretty straightforward.
If you look at the Environment column, you’ll see that each value has several machines assigned to those values. I often see users doing something like this in order to be explicitly clear as to where the values are assigned, however this is an example of being too specific. The machine scopes here don’t add value as the environment and role are sufficient enough to get the job done. So what should this look like?
[table caption=”Variables Example #2 – fixed” width=”650″ colwidth=”100|400|150″ colalign=”left|left|left”]
Name,Value,Scope
dbConn,Server=SqlDbSrv-01\SampleAppDev; Database=sampleDb; User Id=appUserId; Password=Jq^W9HKGP6bP, Environment=Development; Role=WebServer; Machine=DevWeb01|DevWeb02
dbConn,Server=SqlDbSrv-01\SampleAppStg; Database=sampleDb; User Id=appUserId; Password=9C>=rd;_n=+j, Environment=Staging; Role=WebServer; Machine=StgWeb01|StgWeb02
dbConn,Server=SqlDbSrv\SampleAppPrd; Database=sampleDb; User Id=prodAppId; Password=9& R^|==5ur, Environment=Production; Role=WebServer; Machine=PrdWeb01|PrdWeb02|PrdWeb03
[/table]
In this fixed example, I’m removing the machines. Specifying the machine(s) or any steps would make the scope too narrow – even though adding a machine and/or step would work, there’s just no additional value for being overly specific. And this idea of precision within scoping can be detrimental as your project progresses in size. We’ll come back to this idea later on in this deep dive.
Now, after our simple example we can further have Octopus manage the values within the value string by adding.. you guessed it – more variables. Let’s revise our variables for a more granular level of control.
[table caption=”Variables Example #3″ width=”650″ colwidth=”100|400|150″ colalign=”left|left|left”]
Name,Value,Scope
dbConn,Server=#{dbServer}; Database=#{dbName}; User Id=#{dbUserId}; Password=#{dbPwd}, Role=WebServer
dbServer,SqlDbSrv-01\SampleAppDev,Environment=Development;Role=WebServer
dbServer,SqlDbSrv-01\SampleAppStg,Environment=Staging;Role=WebServer
dbServer,SqlDbSrv\SampleAppPrd,Environment=Production;Role=WebServer
dbName,sampleDb,Environment=Development;Role=WebServer
dbName,sampleDb,Environment=Staging;Role=WebServer
dbName,sampleDb,Environment=Production;Role=WebServer
dbUserId,appUserId,Environment=Development;Role=WebServer
dbUserId,appUserId,Environment=Staging;Role=WebServer
dbUserId,prodAppId,Environment=Production;Role=WebServer
dbPwd,Jq^W9HKGP6bP,Environment=Development;Role=WebServer
dbPwd,9C>=rd;_n=+j,Environment=Staging;Role=WebServer
dbPwd,9& R^|==5ur,Environment=Production;Role=WebServer
[/table]
We still have the dbConn variable value and removed the remaining two variables. You can also see that the connection string value now has variables within the string itself. #{dbServer}, #{dbName}, #{dbUserId} and #{dbPwd} are all variables that the dbConn variable will evaluate based on scope. In this example, you could easily change just one parameter without affecting anything else. Note my use of Environments and Roles – I use WebServer for my server role because connection strings will be in my Web.Config files.
As you can see, just with a simple connection string for every environment I have I also have to have four entries for the variables. In this example, I have to have twelve variables just to deal with the connection strings. Depending on your configuration changes per environment, this can grow rapidly out of control and it can become a maintenance problem over time. I’ve seen a lot of teams have problems with production deployments simply because they forgot to create their production variables because they have too many variables for other environments. For such a fine level of control, it’s a great feature to have – especially when you need it. But in my experience, I’ve found that using variables within other variables sparingly and keeping things simple to be the desired approach for low-maintenance and error-free deployments.
I’m going to repeat myself again – I think there’s a lot to be said for variable scope. Is this level of control worth all the extra work? As usual – it depends. In this example it’s overkill. Granted there are creative ways to utilize variables within variables in different scenarios but ultimately it’s up to you. I try to think of variables in terms of mass – the more precise the scope, the greater the mass. Now how easy is it to move something light such as a feather compared to an anvil? Why weigh down your scopes to something super-specific when all you needed was to be just specific enough to get your values correct while allowing for some flexibility?
Another feature of variables is the ability to hide or obfuscate sensitive information – whether it’s passwords, connection string information, port numbers, etc. Octopus can hold private information and not reveal the value anywhere after being saved as sensitive. If you click within the value field of a variable, you’ll see the sensitive checkbox appear.

Simply check the “sensitive” checkbox option on a variable value, save it and Octopus will hide the contents from all users.

Note: Octopus will not report what the value of a sensitive variable within the task log! Additionally, if you wish to export your project to another Octopus server, the import process will exclude any values marked as sensitive and you will need to re-enter your information in the sensitive variables again on the new server.
Another feature that’s seldom used is the prompt. You can prompt for a variable value at deployment time. It may seem odd to ask for input before a deployment has started but it leads to some creative solutions for projects that aren’t quite the norm.
We use prompt values for our own internal project that builds out projects on our own Octopus server and NuGet server using PowerShell and the Octopus API. Creating a project by hand is relatively simple, but using the Web Portal UI it can take some time. With hundreds of project groups/projects/teams/etc., the time to create each one adds up quickly so we (Dalmiro Granas and I) came up with an automated provisioning process within Octopus Deploy. To create a new project for a team, we simply deploy the project and we have numerous prompt values to customize for the project team. We could simply alter the variable values, but prompt values make sense in this example.
All these capabilities are inherit within variables (substitution) within Octopus Deploy. While my explanation was quite lengthy, the goal was to introduce the features that variables can offer. Many users overlook variables but once you know what they can do, you’ll realize the power that variables give you to automate more aspects of your deployments.
Extended Variable Syntax
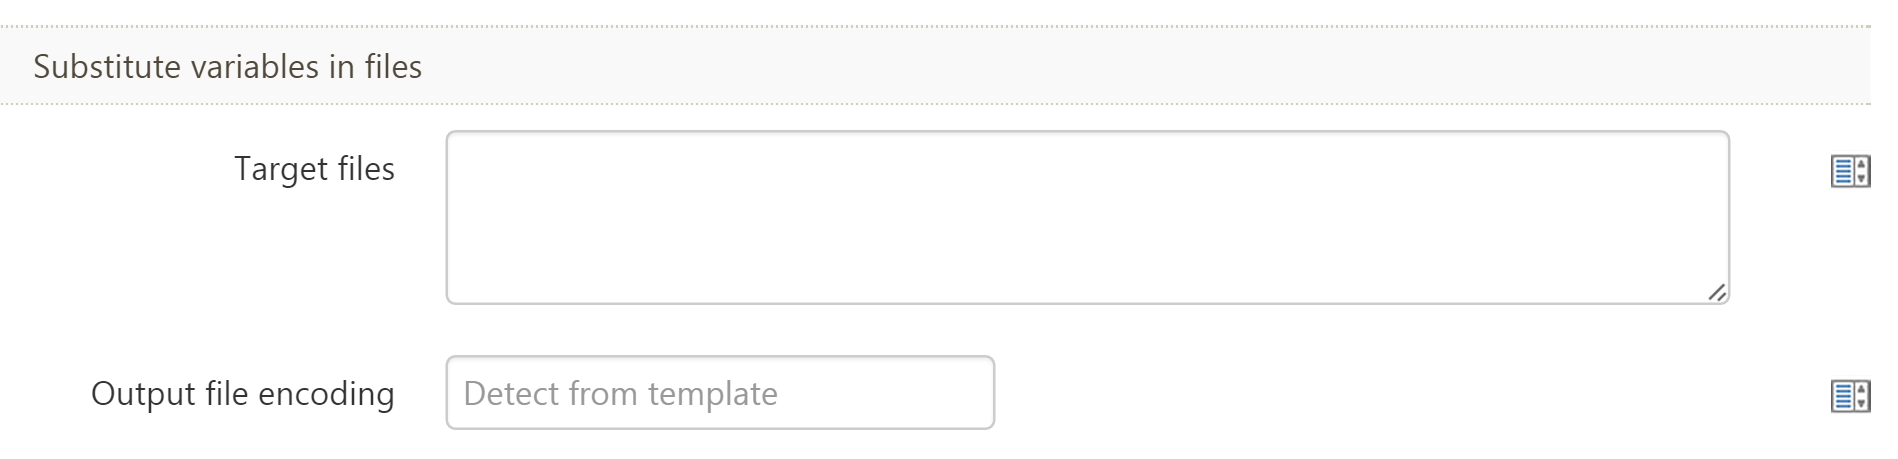
Extended variable syntax is relatively new to the Octopus Deploy feature set as of version 2.5. You can enable this feature in the NuGet package step and clicking on the “Configure Features” link toward the bottom of the step. Simply enable the field like so:

And your NuGet package deployment step will show the following fields:
When would you use this? Well, that’s a good question. Admittedly, I haven’t used this feature before. I think this is best for customizing the body of an email. Most of our teams use PowerShell and a combination of System Variables to get the desired content in an email, but I think the best information on this is the official documentation on extended variable syntax from Octopus Deploy. Since I haven’t used this before and I don’t know of many others who have, I can’t write too much about this. Just know that this is an option. I think some users would be interested to know more about this, but since it’s not highly advertised or mentioned much, I wanted to make people aware about this capability.
System Variables
The next type of variables are system variables – essentially access to information within Octopus Deploy. System variables are predefined variables that are accessible anywhere within Octopus. Whether you want to access them from your custom PowerShell scripts or your own variables, system variables hold internal information regarding your server, your project and your deployment that you may want. For example:
#{Octopus.Environment.Name}
#{Octopus.Project.Name}
#{Octopus.Release.Number}
#{Octopus.Action.Package.NuGetPackageId}
These are a tiny sample of the variables available to you for your deployments. Many of these variables are self-explanatory but my recommendation is to head over to the official Octopus Documentation on System Variables to see what’s available to you. Try some out. You may find you don’t need any or you may need a few you didn’t realize were available. Either way, you should be aware of system variables and their utility.
Variable Sets
Variable Sets are a neat feature that allow you to share a common set of variables in any project. For any size organization, it makes sense to use variable sets however I imagine they’re much more frequently used in small to medium sized organizations or projects. Simply clicking on the “Library” link at the top-right corner will take you to the following screen. Click on the “Variable Sets” at the bottom. Here you can add your custom variable set and then reuse all these variables in your projects.

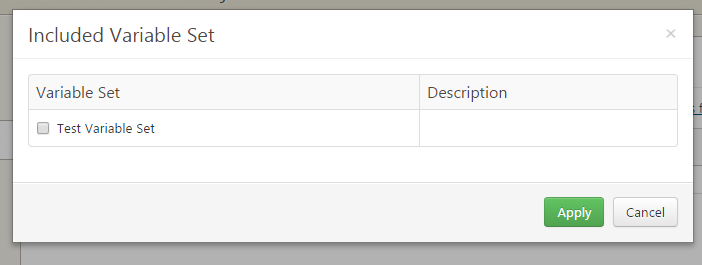
To use your variable set, within your variables tab for your project, simply click on “Include variable sets from the Library”..

And you’ll be prompted with a selection of all variable sets that are available in the library. It’s very straightforward and easy to use.
Best Practices
Now that we’ve covered variables, let’s talk about best practices. In order to have an atomic, fire-and-forget deployment, using variables with Octopus makes your steps environment agnostic – which is a good thing. Having to repeat the same step across your environments is a treacherous path and can only lead to problems. In my Zen of Deployment Automation rant, I cover this exact issue of repeating specific steps but assigning different environments. Variables are the magic that abstract your steps away from discrete environments and let you creatively mix-n-match the correct parameters per any given environment, server role, step or down to the actual machine. The scoping mechanism within Octopus Deploy allows you to configure variables from a wide aspect to the most granular – but typically, being less specific is actually better. Which would you rather have? A clear-cut, simple and consistent deployment process across all environments.
Or perhaps you prefer the verbose, overly-specific and error prone way for orchestrating your deployment process steps like this:

This deployment process just shows two environments. Production isn’t included for brevity. Notice that for every N # of environments you have, you have to duplicate each step on the top to the bottom. This is laborious, error prone and deployments only have a greater risk of failure. Why?
First, copying and pasting steps sounds simple but everyone is capable of screwing up the most simple of tasks. Don’t trust yourself or others to always get it right. If you’re going to automate, go all the way. Leverage variables to adjust the settings accordingly by your scopes carefully and in the long run, your deployment process can work with whatever changes you may need to make and you’ll have significantly less work to do.
Secondly, I see users work around these environment issues by turning off and on steps for each deployment to a specific environment. Again, this is an error prone practice. Users may forget to enable a step or do accidentally enable a step that should not have been. There’s nothing automated turning off/on steps whatsoever.
Lastly, how is this maintainable? Imagine having five, six, or ten more environments – and then imagine having to make ONE change. What would it take to add an environment or remove one? What’s the effort in adding or removing a step? When you leverage variables and environments properly you have less maintenance. By not being overly specific and giving some wiggle room, you can add/delete environments/variables with confidence. Being too explicit with your variable scopes and environments forces you to be consistently explicit and with large projects, things often become a house of cards. The absence of detail in scopes being a positive is such a subtle feature that often, I’m not sure if others see this as a feature like I do.
In my experience, I’ve seen one team go as far as to have one-hundred and fifty steps. You read that right. 150. 1-5-0. Would you like to make the one change in that deployment process? Yeah, neither does that team who created that monstrosity. Variables allow you to change values dynamically based on your scope. This is very powerful and very simple – don’t neglect this capability. Use it and your deployments will be better for it.
Are we there yet?
Variables are an indicator of how well your Octopus Deploy project is constructed and, if done correctly, can make your deployments easy, flexible and fast. Between scoping and your deployment process, there’s a lot of tough lessons to be learned and what I’m trying to bring to light is to be mindful of variables. Use them and use them wisely, the dividends will be more than worth your time. Use them hastily and without forethought, you may end up making things harder for yourself later on.
I’ve seen this with numerous teams; either they neglect variables altogether or they use them but without some planning and ultimately have to do more work and maintenance. It’s hard to explain why variables should be treated with more attention and foresight since you can see with my examples, it’s not a simple concept to convey. If your project is in a hurry, it may be that you want to just deploy quickly and get on with development – and that’s fine. Octopus is extremely open-ended, perhaps to a fault. There’s very few restrictions in Octopus and for the majority of the time, that’s a benefit – except when it isn’t. I’ve seen more frequently with teams as of late botch their deployment processes and get too lengthy and they compound things with variables incorrectly. Then the project atrophy and procrastination sets in and taking the time to actually fix a deployment process and variables can be too limited or non-existent. None of the teams I’ve coached really want to fix things. I get excuses and I see as time goes on more work and maintenance being done then there really needs to be.
This was clearly a lengthy deep dive. In some ways, this dive was covering the Octopus Deploy documentation in finer detail with more examples and some best practices – which oddly enough would make this really two deep dives into one. Either way, I needed to write this as I’ve noticed users trying out variables – over time there’s either one of three reactions: a) not fully leverage them; b) extensively misuse them and learn the hard way or c) they magically figure them out and properly use them. I encourage all our users to use variables, but even still they fall into traps or poor patterns and have to learn hard lessons. I realize I constantly brought up scope issues and pitfalls, but that’s only because a lot of people don’t see scope quite clearly from the beginning of a project – especially if you’re new to Octopus Deploy. Once a project starts to progress, there’s seldom any time to cleanup and fix the mistakes from the beginning. I hope this deep dive at least brought your attention to variable scope as well as environments. While these features are very powerful, they can become a maintenance and/or debugging problem over time if done improperly. Alright, if you’ve made it this far, thanks for reading especially I’ve been extremely repetitious and boring so let’s wrap things up.
TL;DR
- Variables are probably your best friend in Octopus. They are the magic that allows you to creatively automate your deployments between environments without changing anything within your source code. I have yet to find a reason not to use variables but I have seen many users not use variables or use variables poorly.
- Variables do the dirty work of your configuration management; no more copying/pasting web.configs to preserve values or having different configuration files for each environment!
- Variables can also hold custom values and secure passwords for step templates within your deployment process.
- If your going to automate, go all the way; trust your variables but make sure to rigorously test them before going to production and don’t forget your production values too!
- Be mindful when scoping values to be less specific for flexibility (such as using only the environment and/or a server role); specificity (down to the machine or step level) can require a lot of redundant entries which leads to more maintenance and debugging down the road. Be prudent with scope!
That’ll do it for this deep dive. More is coming down the pipe so stay tuned!
Pingback: Octo.exe – exporting/importing project pitfalls | Ian Paullin
First of all like the article. it confirms I’m doing it right.
I’d just like to let you know there is a bug in 2.6 which affects your variable example 3
https://github.com/OctopusDeploy/Issues/issues/1675
I handle connection strings in this way as I need to have the passwords as sensitive but it means I’ve got to watch out for characters such as ‘&’ as it will convert them to &
Dennis
Thanks, Dennis for pointing that out. We had a team that had that same issue in regards to the ampersand issue within a sensitive variable. Good catch!